In System Clusters, you can manage the clusters registered in the system. Through New Cluster for registering a cluster, Cluster Edit for modifying a registered cluster, and Cluster Delete for removing unnecessary clusters from the list, we provide a flexible cluster management service.
Cluster List
The Cluster screen is largely divided into (1) Filters and (2) List for efficient cluster search.
① Filter
Provider: You can search for AWS, AZURE, GCP, IBM.
Type: You can search for Provisioned, Attached.
Name: You can search for the cluster name.
② List
Cluster Name: Displays the name of the registered cluster.
Provider: Displays the provider icon of the cluster.
Type: Displays the registration type of the cluster.
Last Provisioning Status: Displays the most recent status of the cluster.
Clusters with type "attached" are fixed in the attached state, but clusters with type "provisioned" have the following statuses.
Status | Cluster Provisioning | Cluster Delete | Node Pool Add | Node Pool Resize | Node Pool |
|---|---|---|---|---|---|
Failed | o | o | o | o | o |
Created | o | ||||
Deleted | o | o | o | ||
Updating | o | o | |||
Updated | o | o |
Health : 해당 cluster의 상태를 아이콘으로 나타냅니다.
상태 | 모양 | 내용 |
|---|---|---|
Succeed |  | cluster가 정상 상태입니다.. |
Failed |  | cluster에 이상이 있습니다. |
Unknown |  | cluster의 상태를 알 수 없습니다. |
K8S Version : 설치된 K8S의 버전을 보여줍니다.
Allocated CPU, Memory : 사용되고 있는 리소스의 상태를 보여줍니다.
Nodes : 사용되고 있는 노드의 수를 보여줍니다.
Actions :
버튼 | 모양 | 내용 |
|---|---|---|
Detail |  | cluster detail를 확인합니다. |
Delete |  | cluster를 삭제합니다. |
New Cluster
The New Cluster service is provided in two ways: Attach Cluster, which registers a Cluster used in CSP, and Cluster Provisioning, which installs a new Cluster.
Attach Cluster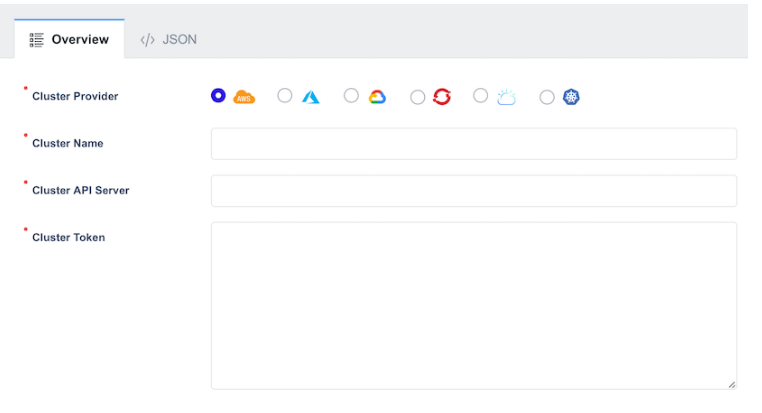
Select the provider type you want to install from the Cluster Provider and set the desired Cluster Name. Then, follow the steps below to obtain and enter Cluster API Server and Token information, and click Attach to register the Cluster.
# Access the cluster to be registered and execute the following command.
$ kubectl create ns zcp-system
$ kubectl create serviceaccount zcp-mcm-backend-service-admin -n zcp-system
$ kubectl label sa zcp-mcm-backend-service-admin -n zcp-system zcp-mcm-default=true
$ kubectl create clusterrolebinding zcp-mcm-backend-service-admin \
    --clusterrole cluster-admin \
    --serviceaccount zcp-system:zcp-mcm-backend-service-admin
$ kubectl label clusterrolebinding zcp-mcm-backend-service-admin zcp-mcm-default=true
CLUSTER_APISERVER=$(kubectl config view --minify | grep server | cut -f 2- -d ":" | tr -d " ")
CLUSTER_TOKEN=$(kubectl describe secret -n zcp-system $(kubectl get sa zcp-mcm-backend-service-admin -n zcp-system -o jsonpath='{range .secrets[*]}{.name}{"
"}' | grep zcp-mcm-backend-service-admin-token) | grep -E '^token' | cut -f2 -d':' | tr -d " ")
echo "-----------------------------"
echo "CLUSTER_APISERVER :: " $CLUSTER_APISERVER
echo "CLUSTER_TOKEN :: " $CLUSTER_TOKEN
Cluster Provisioning
Cluster Provisioning allows you to install a cluster by selecting a provider and entering the appropriate information for the service provided by that provider. (In Modernization Platform v2.0, AKS and EKS are enabled.)

AKS
Basic info
Select the Kubernetes version and Location required for AKS cluster installation, enter the desired Cluster Name, and configure the Resource Group Name reuse setting using the ON/OFF button.
2. Credential
Enter the Subscription Id, Client Id, Client Secret, and Tenant Id.
3. Node Group
Set values for the default Node Group installation.
4. Network
Configure network settings. Enable the ON button for Virtual Network and Subnet reuse and enter only the Name; otherwise, input the address along with it. Docker Bridge Cidr is set by default, while Pod Cidr, Service Cidr, and Dns Service Ip need to be entered to configure the Network.
5. Security
Set up the Network Security Group by configuring Name and Rules.
Enable the ON button if reuse is needed and enter only the Name.
6. Etc
Enter the Admin Username. Once all settings are complete, the provisioning button will be activated. Click it to start the provisioning process.
EKS
Basic info
Select the region and Kubernetes version required for EKS cluster installation, and enter the desired Cluster Name.

2. Credential
Enter the issued AWS Access Key and AWS Secret Key.
3. Node Group
Set values for the default Node Group installation. (Ensure the pool size does not exceed the max size.)
4. Network
Configure network settings. First, determine the public and private access for the Endpoint. Click the ON/OFF button to set the desired access method. Then, configure the VPC, Subnet, Internet Gateway, and Routable values. By default, reuse is disabled for these settings.
If reuse is not needed, simply specify the Name for each setting. If reuse is required, enable it using the ON/OFF button and enter the corresponding ID.
5. Security
Security Group Enable is enabled by default. If reuse is not needed, configure Name and Group Rules. If reuse is required, enable it using the ON/OFF button and enter the Security Group ID.
6. Etc
If necessary, configure CloudWatch Log Retention In Days and log type for AWS cloud resources and applications running on AWS. Once all settings are complete, the provisioning button will be activated. Click it to start the provisioning process.
Cluster Edit
In Modernization Platform v2.0, two editing features are provided for registered Clusters: Add-ons Install and Node Pool Edit. Add-ons can enhance registered Cluster functionality, while Node Pool Edit allows more flexible use of node pools.
Add-ons
Add-ons list
Fluent-bit
Fluentd
Ingress-nginx
Prometheus
Prometheus-blackbox-exporter
prometheus-k8s-events-exporter
Installation
1. Fluent-bit
Select the latest version and click Save to install.
2. Fluentd
Select the latest version and click Save to install.
3. Ingress-nginx
Enter the desired Name, select a Version, and a window will open to enter the required Parameters for installation. The Parameters are set to default values, but you can modify them if needed, then click Save to install.
4. Prometheus
Select the latest version and click Save to install.
5. Prometheus-blackbox-exporter
Select the latest version and click Save to install.
6. prometheus-k8s-events-exporter
Select the latest version and click Save to install.

Installation Verification and Removal

Installed Add-ons can be checked under Installed, and if you want to remove an add-on, click Remove to delete it.
Node Pool
Use the Actions buttons to modify the Node Pool by adding, resizing, or deleting it.
Button | Appearance | Description |
|---|---|---|
Add |  | Adds a Node Pool. |
Detail |  | Modifies a Node Pool. |
Resize |  | Adjusts the size of a Node Pool. |
Delete |  | Deletes a Node Pool. |
AKS
Add Node Pool
Click the Add Node Pool button at the top left to open a window for adding a new Node Pool.
Configure the values and click Save to add the node.
Resize Node Pool
Click the Resize button under Actions to open a window for resizing the Node Pool. Select the desired Pool Size to adjust the size of the Node Pool. ( * The pool size must not exceed the configured Max size.)
Delete Node Pool
Click the Delete button under Actions to delete the Node Pool.
EKS
Add Node Pool
Click the Add Node Pool button at the top left to open a window for adding a new Node Pool.
Configure the values and click Save to add the node.
Resize Node Pool
Click the Resize button under Actions to open a window for resizing the Node Pool. Select the desired Pool Size to adjust the size of the Node Pool. ( * The pool size must not exceed the configured Max size.)
Delete Node Pool
Click the Delete button under Actions to delete the Node Pool.
Cluster Delete
Click the Delete button under Actions to open a window for Cluster Deletion. When a cluster is deleted, it will be removed from the management list.

Online consultation
Contact us